


Django Crafts (4 Part Series)
1 Django 2FA With Google Authenticator
2 Role-Based Access Control in Django
3 Implementing SSO In Your Django Project
4 Captcha & reCaptcha For Django
Django Django Djnago Djonga Djingo!!!
I have been on a mission to build things around Django for more than half a decade now, you won’t say it? Congratulations to me!!!
Back to business, Aren’t you skeptical about your security on your applications or platforms you use daily? To be honest I am.
Small exercise, go back to line one of this blog and read well. How many “Django” can you see?
It is not more new to hear about terms like MFA, 2FA, OPT (TOPT, HOTP) and other Passwordless. Today Let’s get more interested into 2FA using Google Authenticator. Why Google Authenticator? Jot that somewhere please, I will answer in a few minutes.
What is 2FA?
This story goes way way way back around the… (kidding)
Two-Factor Authentication (2FA) is a security mechanism that requires two independent authentication factors to verify a user’s identity. It consists of a knowledge factor (something you know, like a password) and a possession factor (something you have, like an OTP token, authenticator app, or hardware key). The authentication process involves entering the primary credential, followed by verification using the second factor. It is commonly implementated into TOTP (Time-Based One-Time Passwords) and FIDO2 security keys.
Why the “Collabo” with Django?
You might have not known nor hear about Django, but give it a try. However Django quickly and easily integrates with anti-phishing, breaches and brute force attacks recent discoveries and those to come (You can always contradict me, Down). Because of Django vast, rich, active communities and ecosystem libraries supporting such integrations already do exist. Lastly and the most important, an extra security layer, improving user confidence blocking attackers who reuse stolen passwords from data breaches and also COMPLIANCE.
Implementation
With further ado, here is how this can be done with Django. Do not worry, in case you miss something, I have the codebase somewhere for you, read carefully to see the link. We will be going through the project setup (dependencies, structure and configuration), models, db migrations and project execution.
Setting up the project
Whoever calls my name prior to a python project should call performance, architecture, good resource utilization and best practices (but who defines best practices?).
- Creating folders and virtual environment
mkdir django2fa && cd django2fa

python -m venv .venv

source .venv/bin/activate

pip install django-two-factor-auth webauthn pillow pyotp phonenumbers
Enter fullscreen mode Exit fullscreen mode
- Creating Django Project and Django App
django-admin startproject django2fa .

python manage.py startapp accounts

touch accounts/urls.py
Enter fullscreen mode Exit fullscreen mode
- Tree structure
.
├── .venv/
├── accounts
│   ├── admin.py
│   ├── apps.py
│   ├── __init__.py
│   ├── migrations
│   │   ├── 0001_initial.py
│   │   └── __init__.py
│   ├── models.py
│   ├── tests.py
│   ├── urls.py
│   └── views.py
├── db.sqlite3
├── django2fa
│   ├── asgi.py
│   ├── __init__.py
│   ├── settings.py
│   ├── urls.py
│   └── wsgi.py
├── manage.py
├── README.md
├── requirements.txt
└── templates
    └── two_factor
        └── _base.html

6 directories, 19 files
Enter fullscreen mode Exit fullscreen mode
- Django project settings edits
# settings.py
 + SECRET_KEY = os.getenv('SECRET_KEY')  + DEBUG = True if os.getenv('DEBUG') == 'True' else False + ALLOWED_HOSTS = os.getenv('ALLOWED_HOSTS').split(',') if os.getenv('ALLOWED_HOSTS') else []  + INSTALLED_APPS = [ # ...
+ 'django_otp', + 'django_otp.plugins.otp_static', + 'django_otp.plugins.otp_totp', + 'django_otp.plugins.otp_email',  + 'two_factor', + 'two_factor.plugins.phonenumber', + 'two_factor.plugins.email',  + 'accounts',  # ...
+ ]  + MIDDLEWARE = [ # ...
+ 'django_otp.middleware.OTPMiddleware', # ...
+ ]  # ...
 + AUTHENTICATION_BACKENDS = [ + 'django.contrib.auth.backends.ModelBackend', + ]  + LOGIN_URL = 'two_factor:login' + LOGIN_REDIRECT_URL = 'two_factor:profile' + LOGOUT_REDIRECT_URL = 'two_factor:login'  + TWO_FACTOR_PATCH_ADMIN = True + TWO_FACTOR_STRIC = True  + AUTH_USER_MODEL = 'accounts.STUser'
Enter fullscreen mode Exit fullscreen mode
- Urls.py modifications:
from django.contrib import admin
from django.urls import path, include
from two_factor.urls import urlpatterns as tf_urls

urlpatterns = [
    path('admin/', admin.site.urls),
    path('', include(tf_urls)),
    path('', include('accounts.urls')),
]
Enter fullscreen mode Exit fullscreen mode
Let’s have the demo
-
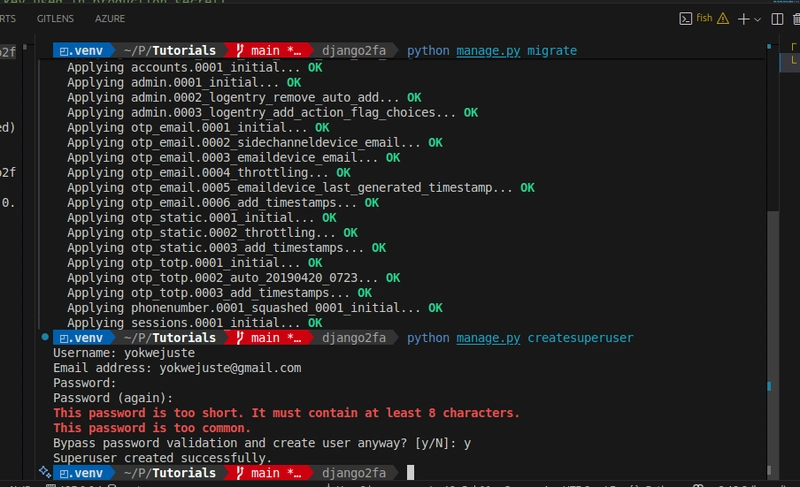
Running migrations and creating a superuser

-
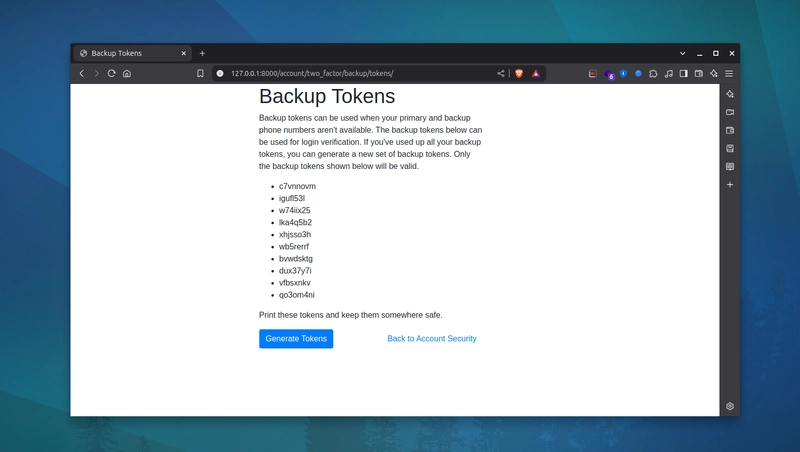
DEMO
![图片[1]-Django 2FA With Google Authenticator - 拾光赋-拾光赋](https://media2.dev.to/dynamic/image/width=800%2Cheight=%2Cfit=scale-down%2Cgravity=auto%2Cformat=auto/https%3A%2F%2Fdev-to-uploads.s3.amazonaws.com%2Fuploads%2Farticles%2F4q7p7v0l3wd995sjtwgn.png)
![图片[2]-Django 2FA With Google Authenticator - 拾光赋-拾光赋](https://media2.dev.to/dynamic/image/width=800%2Cheight=%2Cfit=scale-down%2Cgravity=auto%2Cformat=auto/https%3A%2F%2Fdev-to-uploads.s3.amazonaws.com%2Fuploads%2Farticles%2Fzevj2y8bggeanjyx7laa.png)
![图片[3]-Django 2FA With Google Authenticator - 拾光赋-拾光赋](https://media2.dev.to/dynamic/image/width=800%2Cheight=%2Cfit=scale-down%2Cgravity=auto%2Cformat=auto/https%3A%2F%2Fdev-to-uploads.s3.amazonaws.com%2Fuploads%2Farticles%2Fdkurz9es7jbenr0aanr4.png)
![图片[4]-Django 2FA With Google Authenticator - 拾光赋-拾光赋](https://media2.dev.to/dynamic/image/width=800%2Cheight=%2Cfit=scale-down%2Cgravity=auto%2Cformat=auto/https%3A%2F%2Fdev-to-uploads.s3.amazonaws.com%2Fuploads%2Farticles%2Fe4f08fe6dayrbdlrj2fu.png)
![图片[5]-Django 2FA With Google Authenticator - 拾光赋-拾光赋](https://media2.dev.to/dynamic/image/width=800%2Cheight=%2Cfit=scale-down%2Cgravity=auto%2Cformat=auto/https%3A%2F%2Fdev-to-uploads.s3.amazonaws.com%2Fuploads%2Farticles%2Fgmmuekbjkxx03aywaiu6.png)

Wrapping Up
Alright, alright, what are your thoughts? Was this helpful? Personal thoughts about these is to look for all possible ways to authenticate users. What about “Signin with Eyes? or DNA?” Don’t think it is a joke.
Because the people who are crazy enough to think they can change the world, are the ones who do. – STEVE JOBS
So are you crazy enough?

Django Crafts (4 Part Series)
1 Django 2FA With Google Authenticator
2 Role-Based Access Control in Django
3 Implementing SSO In Your Django Project
4 Captcha & reCaptcha For Django


暂无评论内容