Get started with PyQGIS (3 Part Series)
1 Get started with PyQGIS 01 – Some basic commands with QGIS python console
2 Get started with PyQGIS 02 – Manage layers with QGIS python console
3 Get started with PyQGIS 03 – Manipulate vector layers with QGIS python console
The first chapter of this PyQGIS tutorial series told about basic commands and approach of PyQGIS module.
This second chapter tell you about how to manage layers with some usual commands.
You can use your own data or use a sample data of Paris region cities from France government platform.
1. Open script editor of Python Console
In Python console we can launch commands one by one, but we need several commands to manage layers.
To run those at once, we need to open the script editor.
1.1. Open Python console in QGIS
As for the first chapter :
Open QGIS, menu -> Plugins -> Python Console
![图片[1]-Get started with PyQGIS 02 - Manage layers with QGIS python console - 拾光赋-拾光赋](https://media2.dev.to/dynamic/image/width=800%2Cheight=%2Cfit=scale-down%2Cgravity=auto%2Cformat=auto/https%3A%2F%2Fdev-to-uploads.s3.amazonaws.com%2Fuploads%2Farticles%2Fi8bbeipl8but0ghdhg5v.png)
Or use shortcut Ctrl+Alt+P (Windows) command+option+P (mac)
Python console open usually at the bottom of QGIS frame
1.2. Open Script Editor
Click on the Show Editor button to open script editor as below:
2. Layer related commands
Here are some basic commands to manage layers in a QGIS project.
2.1. Import layer from file
Layer can be load in QGIS with two commands:
# 1- declare a new layer and specify file_path and layer name layer = QgsVectorLayer(file_path, layer_name, "ogr")
# 2- import declared layer QgsProject.instance().addMapLayer(layer)
Enter fullscreen mode Exit fullscreen mode
On script editor, copy the following code, adapt to the file you want to import, and run.
file_path = "your/path/data/target_file.shp"
layer_name = "my fantastic layer"

# declare a new layer and specify file_path and layer name layer = QgsVectorLayer(file_path, layer_name, "ogr")
# import declared layer QgsProject.instance().addMapLayer(layer)
Enter fullscreen mode Exit fullscreen mode
2.2. Import only a part of features from file
We can import a part of features by filtering declared layer.
The following command will filter data where
target_field = 'target_value'
and it should be put before import command.
layer.setSubsetString("target_field='target_value'")
Enter fullscreen mode Exit fullscreen mode
In process, layer name will be added with ‘filtered’ suffix:
file_path = "your/path/data/target_file.shp"
layer_name = "my fantastic layer filtered"

# declare a new layer and specify file_path and layer name layer = QgsVectorLayer(file_path, layer_name, "ogr")
# filter layer before import layer.setSubsetString("target_field='target_value'")
# import declared layer QgsProject.instance().addMapLayer(layer)
Enter fullscreen mode Exit fullscreen mode
On below pic, data is filtered with only Paris’ wards with:
layer.setSubsetString("numdep=75")
Enter fullscreen mode Exit fullscreen mode
2.3. List layers
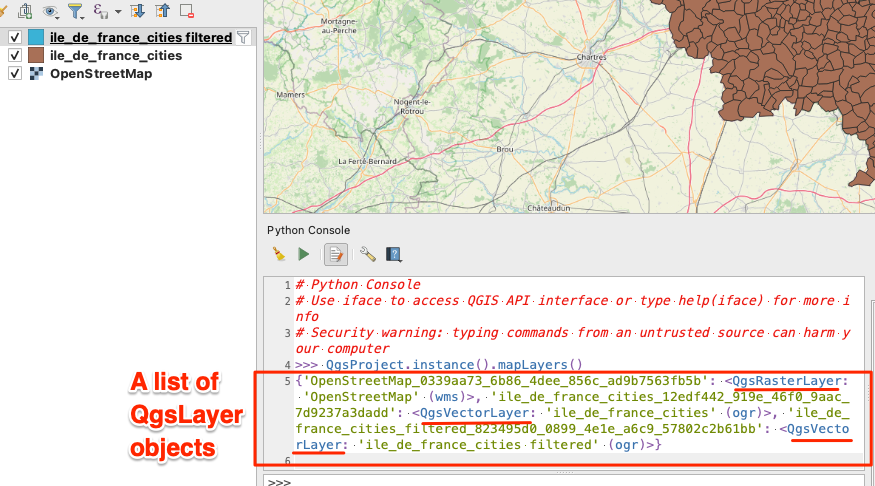
There are various ways to list layers: we can retrieve layers as object or just layers name.
- Running following command directly on python console will show a list of layer, not by layer name, but by object showing layer ID, and their PyQgis type: “`python
QgsProject.instance().mapLayers()

- Adding `.values` on above result will reduce response to class and layer name:
```python
QgsProject.instance().mapLayers().values()
Enter fullscreen mode Exit fullscreen mode
To retrieve only layers’ name, use the .name() attribute of each layer object:
for layer in QgsProject.instance().mapLayers().values():
     print(layer.name())
Enter fullscreen mode Exit fullscreen mode
2.3. Retrieve a layer by name
A layer can be retrieved by name with the following command:
QgsProject.instance().mapLayersByName("search_layer_name")
Enter fullscreen mode Exit fullscreen mode
This is the main way to retrieve a layer and manipulate it.
This command will not return layer, but a list of layers which fit to target name.
So, to get layer as unique, you can add an iteration like [0], which means the first matching of returned list:
QgsProject.instance().mapLayersByName("search_layer_name")[0]
Enter fullscreen mode Exit fullscreen mode
2.4. Remove layer
removeLayer method of QgsProject.instance() is used.
As written in documentation, target layer ID is required.
layer ID can be retrieved with by adding .id() method of layer class that we retrieved in previous step.
layer = QgsProject.instance().mapLayersByName("search_layer_name")[0]
print(layer.id())
Enter fullscreen mode Exit fullscreen mode
Thus, we can use this id to remove layer.
layer = QgsProject.instance().mapLayersByName("search_layer_name")[0]
QgsProject.instance().removeMapLayer(layer.id())
Enter fullscreen mode Exit fullscreen mode
3. The use of QgsProject class to manage layers
In this second chapter, QgsProject.instance() has been mainly used to add, retrieve and remove layer.
Regarding documentation, many other manipulations can be done, such as remove all layers or manipulate other project matters.
Retrieving layers as objects also makes introduced us to QgsVectorLayer which will be the topic of the next chapter.
Get started with PyQGIS (3 Part Series)
1 Get started with PyQGIS 01 – Some basic commands with QGIS python console
2 Get started with PyQGIS 02 – Manage layers with QGIS python console
3 Get started with PyQGIS 03 – Manipulate vector layers with QGIS python console
原文链接:Get started with PyQGIS 02 – Manage layers with QGIS python console


暂无评论内容