Just because we do something one way, doesn’t always mean it is the right way … or even the best way.
As long as I can remember, I’ve included log messages in my code to provide run-time insight into what the code is really doing. From developers running locally all the way to the eyes of a production support engineer, these extra lines of code are meant to help troubleshoot unexpected scenarios.
The problem with this approach is that the entire process seems a bit off. Something unexpected happens, so we struggle to locate the root cause using some logging solution, tracing the log messages and stack trace backwards trying to determine where the reality differed from the expectations. This can take a lot of effort and time — and all at the price of impatient customers (both internal and external) wondering why things are not working properly.
When I started reading about Rollbar, I began to wonder if my years of doing something one way wasn’t the right way after all. So I decided to try out Rollbar to see if it offered a better way than my current process.
What Is Rollbar?
Rollbar provides a different approach to application monitoring. It’s focused on not only agile development and continuous delivery, but on providing real-time visibility into your application without having to refresh cluttered log screens and mine mountains of data. Furthermore, the data that arrives into the Rollbar dashboard not only delivers on the metrics expected by production support and DevOps teams, but also links to the underlying source code — even to the point where existing tickets can be linked to an unexpected event … or a new ticket can be created directly from Rollbar itself.
So when Rollbar reports an error, you’re often just a click away from the offending source code and creating a new ticket.
I feel like this is the point where I start to write “but wait … there’s more.” Honestly, there really is more, but now is a good time to stop going down the marketing path and actually do something with Rollbar itself.
Getting Started
Before we get into the details, let’s first walk through the setup. The first thing we need to do is to set up an account by visiting the following link:
You should see a screen similar to what is shown below:
Once submitted, a free account is created. The next step is to create a new Project:
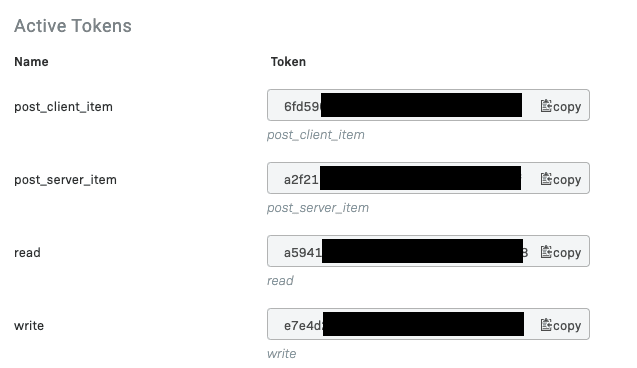
Think of a project as an instance of the Rollbar service. In my example, I created a project called “springboot-example” because I plan to use a simple Spring Boot project to take Rollbar for a test drive. For the purpose of this article, I plan to stick with the defaults as much as possible. Before building the Spring Boot service, I need to grab the post_server_item token value from the Project Access Tokens section of the settings for my project:
The post_server_item token, which begins with “a2f21” in my case, will be used by the Spring Boot service that we will create next.
Creating a Spring Boot Service
Using IntelliJ IDEA, I was able to use the Spring Intializr to create a basic Spring API which featured the following dependencies:
<dependencies>
       <dependency>
           <groupId>org.springframework.boot</groupId>
           <artifactId>spring-boot-starter-data-jpa</artifactId>
       </dependency>
       <dependency>
           <groupId>org.springframework.boot</groupId>
           <artifactId>spring-boot-starter-jersey</artifactId>
       </dependency>
       <dependency>
           <groupId>org.springframework.boot</groupId>
           <artifactId>spring-boot-starter-web</artifactId>
       </dependency>
       <dependency>
           <groupId>com.h2database</groupId>
           <artifactId>h2</artifactId>
           <scope>runtime</scope>
       </dependency>
       <dependency>
           <groupId>org.springframework.boot</groupId>
           <artifactId>spring-boot-configuration-processor</artifactId>
           <optional>true</optional>
       </dependency>
       <dependency>
           <groupId>org.projectlombok</groupId>
           <artifactId>lombok</artifactId>
           <optional>true</optional>
       </dependency>
   </dependencies>
Enter fullscreen mode Exit fullscreen mode
For Rollbar, I added the following dependency to the pom.xml:
<dependency>
   <groupId>com.rollbar</groupId>
   <artifactId>rollbar-spring-boot-webmvc</artifactId>
   <version>1.7.4</version>
</dependency>
Enter fullscreen mode Exit fullscreen mode
I also added some Apache libraries and my own random-generator library:
<dependency>
   <groupId>org.apache.commons</groupId>
   <artifactId>commons-lang3</artifactId>
</dependency>
<dependency>
   <groupId>org.apache.commons</groupId>
   <artifactId>commons-collections4</artifactId>
   <version>4.1</version>
</dependency>
<dependency>
   <groupId>com.gitlab.johnjvester</groupId>
   <artifactId>random-generator</artifactId>
   <version>1.9</version>
</dependency>
Enter fullscreen mode Exit fullscreen mode
Basic Service Functionality
For this demo, I created a service that will return a list of musical performers from the classic rock and roll bands Rush and Yes. I did not want to spend a great deal of time building out a data model, so there are two very simple entities in this project:
@Entity
@AllArgsConstructor
@NoArgsConstructor
@Data
public class Musician {

   @Id
   @GeneratedValue(strategy = GenerationType.IDENTITY)
   private long id;

   private String firstName;
   private String lastName;

   @ManyToOne
   private Instrument instrument;
}

@Entity
@AllArgsConstructor
@NoArgsConstructor
@Data
public class Instrument {
   @Id
   @GeneratedValue(strategy = GenerationType.IDENTITY)
   private long id;
   private String name;
}
Enter fullscreen mode Exit fullscreen mode
Since I am using an in-memory H2 database, I included a SQL script called data.sql and placed it into the resources folder. As a result, the script executes every time the Spring Boot server starts.
With the base service in place, I started the Spring Boot service on port 8001 and noticed my use of the Rollbar logo appeared in the logs rather well:
With current versions of Spring Boot, you just have to attach the image called banner.png into the \resources folder of the project and Spring Boot will automatically create what is displayed above.
Next, using Postman, I was able to make a simple GET request to /musicians URI, which returned a 200 OK response and the following data:
[
   {
       "id": 1,
       "firstName": "Alex",
       "lastName": "Lifeson",
       "instrument": {
           "id": 1,
           "name": "Guitar"
       }
   },
   {
       "id": 2,
       "firstName": "Trevor",
       "lastName": "Rabin",
       "instrument": {
           "id": 1,
           "name": "Guitar"
       }
   },
   {
       "id": 3,
       "firstName": "Geddy",
       "lastName": "Lee",
       "instrument": {
           "id": 2,
           "name": "Bass"
       }
   },
   {
       "id": 4,
       "firstName": "Chris",
       "lastName": "Squire",
       "instrument": {
           "id": 2,
           "name": "Bass"
       }
   },
   {
       "id": 5,
       "firstName": "Tony",
       "lastName": "Kaye",
       "instrument": {
           "id": 3,
           "name": "Keyboards"
       }
   },
   {
       "id": 6,
       "firstName": "Neil",
       "lastName": "Peart",
       "instrument": {
           "id": 4,
           "name": "Drums"
       }
   },
   {
       "id": 7,
       "firstName": "Alan",
       "lastName": "White",
       "instrument": {
           "id": 4,
           "name": "Drums"
       }
   },
   {
       "id": 8,
       "firstName": "Jon",
       "lastName": "Anderson",
       "instrument": {
           "id": 5,
           "name": "Vocals"
       }
   }
]
Enter fullscreen mode Exit fullscreen mode
At this point, the Spring Boot service has been validated as running, so I decided to commit my code to a new publicly available repository in GitLab.
Configuring Spring Boot to Use Rollbar
Since I am a fan of externalizing as much of the configuration as possible, I decided to use an application.yml file and establish the following custom properties:
rollbar:
 access-token: accessTokenGoesHere
 branch: master
 environment: development
 code-version: codeVersionGoesHere
spring:
 application:
   name: Spring Boot Rollbar Example
Enter fullscreen mode Exit fullscreen mode
For the rollbar properties, I created the following class to allow easy access to these properties:
@Data
@Configuration("rollbarConfiguration")
@ConfigurationProperties("rollbar")
public class RollbarConfigurationProperties {
   private String accessToken;
   private String branch;
   private String codeVersion;
   private String environment;
}
Enter fullscreen mode Exit fullscreen mode
My plan is to never store the access-token and code-version values in the application.yml. Instead, I will pass these in using one of Spring Boot’s options. For this example, the Run/Debug Configuration in IntelliJ IDEA will be used:
The rollbar.access-token property is where we will store the value which begins with “a2f21” and the code-version will be the SHA from GitLab for my latest commit of the master branch—to be populated once everything is set up.
With the configuration properties established, only two configuration classes are required. The first is to establish a Server/Provider for use by Rollbar:
@RequiredArgsConstructor
@Component
public class RollbarServerProvider implements Provider<Server> {

   private final Environment environment;
   private final RollbarConfigurationProperties rollbarConfigurationProperties;
   @Override
   public Server provide() {
       return new Server.Builder()

 .codeVersion(rollbarConfigurationProperties.getCodeVersion())
      .branch(rollbarConfigurationProperties.getBranch())
      .host(environment.getProperty("spring.application.name"))
      .root("com.gitlab.johnjvester.rollbar")
      .build();
   }
}
Enter fullscreen mode Exit fullscreen mode
Next, we add the Rollbar configuration:
@Slf4j
@RequiredArgsConstructor
@ComponentScan({
       "com.gitlab.johnjvester.rollbar",
       "com.rollbar.spring",
})
@Component
public class RollbarConfig {
   private final RollbarConfigurationProperties rollbarConfigurationProperties;
   private final RollbarServerProvider rollbarServerProvider;

   @Bean
   public Rollbar rollbar() {
       log.debug("rollbarConfigurationProperties={}", rollbarConfigurationProperties);

       return new Rollbar(RollbarSpringConfigBuilder       .withAccessToken(rollbarConfigurationProperties.getAccessToken())       .environment(rollbarConfigurationProperties.getEnvironment())
               .server(rollbarServerProvider)
               .build());
   }
}
Enter fullscreen mode Exit fullscreen mode
Finally, I wanted to create global controller exception handler to report back to Rollbar and keep things DRY (don’t repeat yourself):
@Slf4j
@RequiredArgsConstructor
@ControllerAdvice
public class GlobalControllerExceptionHandler {
   private final Rollbar rollbar;
   @ExceptionHandler(value = Exception.class)
   public void handleExceptions(HttpServletRequest request, HttpServletResponse response, RollbarException e) {

 e.getRollbarExceptionData().setIpAddress(request.getRemoteAddr());
e.getRollbarExceptionData().setUri(request.getRequestURI());
e.getRollbarExceptionData().setRequestType(request.getMethod());
       log.error("e.getMessage()={} [{}]", e.getMessage(), e.getRollbarExceptionData());
       rollbar.error(e.getMessage(), e.getRollbarExceptionData().getRollbarMap());
       response.setStatus(HttpStatus.BAD_REQUEST.value());
   }
}
Enter fullscreen mode Exit fullscreen mode
Using Rollbar With Spring Boot
Now let’s see Rollbar working. For this very simple example, I wanted to use Rollbar to capture the following actions:
- When the Spring Boot service started (information).
- When the base musicians API was called with at least one result (information).
- When a forced exception occurred (error).
Using Random Generator With Rollbar
To simulate more than a single user, I created a RollbarUtils static utility class to include user information with each request. I created 17 different users and used the Random Generator framework to pick one user at random. Rollbar allows a map of custom information to be sent with each API call to the Rollbar service, which is available on the Rollbar dashboard.
That same approach was used to return a random error message for the bad request concept I wanted to prove out with this article.
Handling Exceptions and Linking to GitLab
After another commit into the repository on GitLab, I wanted to perform several additional setup steps within the Rollbar application. In the Settings section of the “springboot-example” project, the Integrations | Source Control section was opened and configured as shown below:
Next, I set up the Integrations | Notifications section as shown below:
With these changes, Rollbar can not only link to the source control in the event of an unexpected situation but has the ability to link that event to an existing ticket in GitLab (as an example) or to create a new ticket directly from the Rollbar dashboard.
With the last SHA from GitLab captured, I updated the Run/Debug settings for my Spring Boot application and restarted. This action, which would normally be part of a CI/CD process, allows Rollbar to know the commit hash used by the service.
Using @PostConstruct With Rollbar
With everything in place, creating the informational Rollbar event is quite simple:
@RequiredArgsConstructor
@Slf4j
@Component
public class RollbarEvents {
   private final Environment environment;
   private final RollbarConfigurationProperties rollbarConfigurationProperties;
   private final Rollbar rollbar;

   @PostConstruct
   public void postConstruct() {
       rollbar.info(String.format("Started %s on port #%s using Rollbar accessToken=%s (%s)"
       environment.getProperty("spring.application.name"),
       environment.getProperty("server.port"),       SecurityUtils.maskCredentialsRevealPrefix(rollbarConfigurationProperties.getAccessToken(), 5, '*'),
               rollbarConfigurationProperties.getEnvironment()));
   }
}
Enter fullscreen mode Exit fullscreen mode
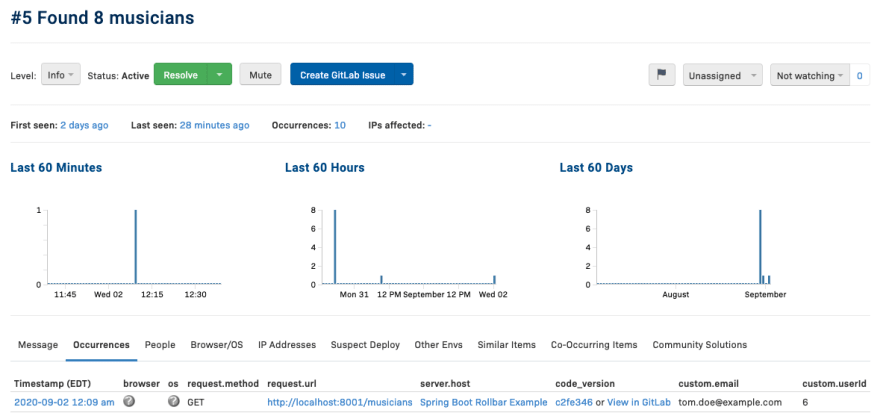
Every time the Spring Boot service starts, the following event is being captured and viewable in real-time from the Rollbar dashboard:
In the screenshot above, notice how there is an option to Create GitLab Issue. This will insert a new ticket into the GitLab issues section, which could also have been set up for a system like JIRA. Clicking the down arrow on that button allows you to link this error to an existing ticket as well.
Calling the /musicians URI
Within the MusicianService, the Rollbar object can be injected via the Spring framework in order to send both informational and warning messages to Rollbar:
public List<Musician> getAllMusicians() {
   List<Musician> musicians = musicianRepository.findAll();

   if (CollectionUtils.isNotEmpty(musicians)) {
       rollbar.info(String.format("Found %s musicians", musicians.size()), RollbarUtils.createRollbarExceptionData().getRollbarMap());
   } else {
       rollbar.warning("Could not locate any musicians", RollbarUtils.createRollbarExceptionData().getRollbarMap());
   }

   return musicians;
}
Enter fullscreen mode Exit fullscreen mode
Now let’s look at the Rollbar Dashboard where we see the following events:
Notice that we see a lot of useful information about the error:
- the details of the request
- the user email of “tom.doe@example.com“
- the user ID value of six
- the number of prior occurrences of this error
- workflow actions such as create or assign/triage an issue
- the code version where this error occurred
- a history of this type of error
Handling a Common Exception
One of the hardest problems for this article was to figure out a way to introduce code which would result in an exception. This is largely due to years of experience of avoiding exceptions topped with IntelliJ IDEA’s client that is always looking to prevent exceptions from ending up into the codebase. After trying to come up with something exciting, I decided to resort to a simple exception as shown below:
public Musician getIndexOutOfBounds() {
   List<Musician> musicianList = new ArrayList<>();
   return musicianList.get(0);
}
Enter fullscreen mode Exit fullscreen mode
In the example above, we create a new list, and the code is attempting to return the first item from the list. This should yield an IndexOutOfBoundsException. The controller calling this code is shown below:
@GetMapping("/indexOutOfBounds")
public ResponseEntity<Musician> getIndexOutOfBounds() {
   return new ResponseEntity<>(musicianService.getIndexOutOfBounds(), HttpStatus.ACCEPTED);
}
Enter fullscreen mode Exit fullscreen mode
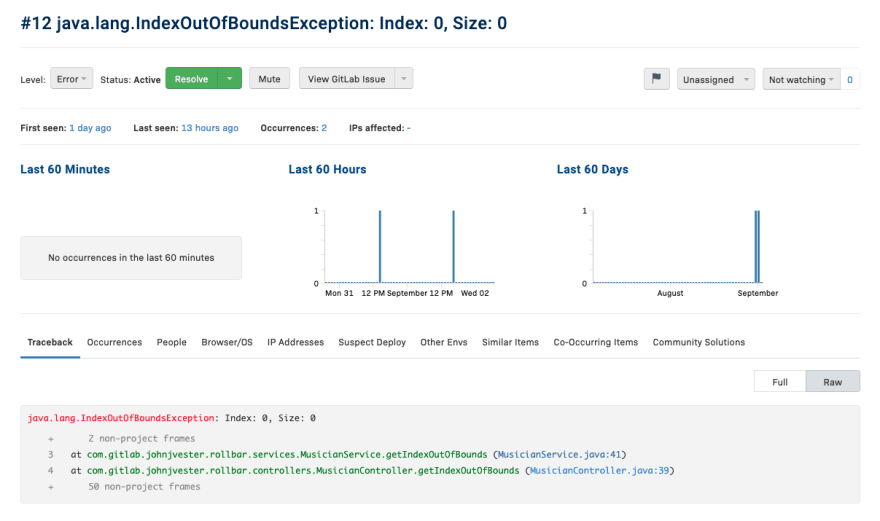
When calling the /indexOutOfBounds URI, the following event arrives into the Rollbar dashboard:
Since I had already linked this issue with GitLab issues, I can view it directly from the Rollbar dashboard. Also, notice how the stack track includes links that take me straight to MusicianService.java:41. When clicking that link a new window opens directly into the GitLab project:
When using the Occurrences tab, there are now links in the code_version column:
Clicking the links take me directly to the commit itself as well:
As an unexpected exception occurs, the Rollbar dashboard can be used to monitor the real-time events and even review the line of source and current commit hash which is running on the server. This would be helpful not only as I’m developing, but also further down the deployment pipeline in test/stage, and of course in prod.
Conclusion
After using Rollbar I feel like my approach to application monitoring was in need of a fresh approach. In essence, I had been taking the same approach for more than two decades of application development and the results of that approach always required more time than I hoped in order to reach the unexpected source of the issue. Rollbar provides a new way of application monitoring, which is not only the right way, but a better way as well.
There were a few challenges with the Rollbar implementation. The short list would include the following items:
- I felt like the use of the RollbarServerProvider should not be required in order to provide the expected data to Rollbar.
- Initially, I wanted to use a @PreDestroy method to alert Rollbar that the service has shut down. However, when the @PreDestory lifecycle event fires, it is too late to contact the Rollbar service.
- What needs to be included in the configuration screens is not truly clear, and the concept of server_root was something I struggled to understand. However, I feel like this article provides everything needed to get Rollbar working fully with the GitLab repository.
In every case, I was able to get a resolution to my issues quickly, using the assistance of the engineering team at Rollbar, especially Vijay!
From a pricing perspective, hobby developers can use the Essentials package for free with a limit of 5,000 events per month. The paid Essentials plan starts at $1 a day for 6,000 events and scales up to $599 a month for 4 million events. The Advanced plan is geared toward customers who require an advanced account dashboard, multi-project feed, and versioning ranges between $99 a month through $999/month for 4 million transactions. In all cases, setting up annual plans reflect a pretty impressive discount.
Rollbar provides a real-time solution that is packed with analytical tools that provide better insight into the application experience than what I have experienced in my career. In fact, I plan to dive deeper into the analytics in a future article while also attaching a JavaScript-based client to access my Spring Boot service.
You are welcome to clone, fork, or download the project I created for this article here.
原文链接:You Can Log Better – How to Implement Real-Time Application Monitoring


暂无评论内容