keikai (5 Part Series)
1 How I Created an Online Budget Report from Excel Files
2 Enable User Input in My Spreadsheet-based App
3 Automate Excel Sheet Processing with Java
4 Protect Formulas in a Web Spreadsheet Application
5 Give your classic spreadsheet a modern touch
A Sheet Processing Use Case
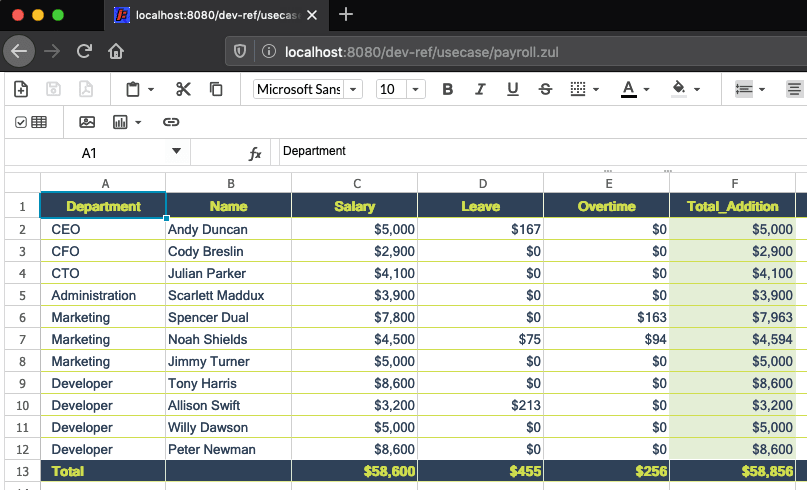
My colleague Penny in the HR department has to do a routine task each month: making payroll sheets for everyone in the company. There is a sheet containing a table of all employees with salary information:
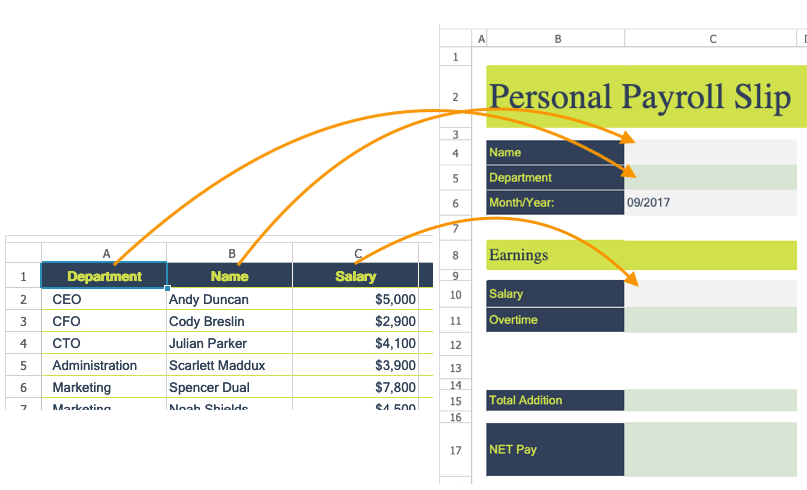
And she has to create payroll sheets for each person on the list based on the template sheet:
To avoid copying cell by cell manually, I create a web application with Keikai to read salary data row by row and produce payroll sheets. The whole process is:

Import a Pre-designed Excel File
I create a Keikai spreadsheet by writing tags and attributes in a zul of ZK framework which is a UI framework based on Java EE. By specifying at src attribute with a file path, Keikai can import my Payroll.xlsx.
    <spreadsheet height="100%" width="100%" src="/WEB-INF/books/Payroll.xlsx"
                 maxVisibleColumns="15" maxVisibleRows="20"
                 hidecolumnhead="false"  hiderowhead="false"
                 showToolbar="true" showSheetbar="true" showFormulabar="true"
                 apply="io.keikai.devref.usecase.PayrollComposer"/>
Enter fullscreen mode Exit fullscreen mode
When I visit the zul with a browser, Keikai renders the file:
The ZK framework will parse the zul page above and instantiate a Keikai Java object(Spreadsheet) for us to control.
Controller
Then I also create a Java controller, PayrollComposer to access the Keikai Java object and apply the controller on the page at apply attribute: apply="io.keikai.devref.usecase.PayrollComposer"
Named Range
I make a cell like a button on the sheet. When I click the cell, Keikai will start to produce payroll sheets. I give a name, Generate, to the cell.
After that, I can create a Range object (generateButton) with the name:
generateButton = Ranges.rangeByName(sheet, "Generate");
Here is the related code snippet:
public class PayrollComposer extends SelectorComposer<Component>{

    @Wire("spreadsheet")
    private Spreadsheet spreadsheet;
    final private static String EMPLOYEE_SHEET = "Payroll";
    private Range generateButton;
    private Sheet sheet;

    @Override
    public void doAfterCompose(Component comp) throws Exception {
        super.doAfterCompose(comp);
        sheet = spreadsheet.getBook().getSheet(EMPLOYEE_SHEET);
        generateButton = Ranges.rangeByName(sheet, "Generate");
    }
...
Enter fullscreen mode Exit fullscreen mode
Listen to Button Clicking
Then I register an event listener for the cell (button) clicking by @Listen and check whether the button generateButton is clicked or not:
    @Listen(Events.ON_CELL_CLICK + "=spreadsheet")
    public void onCellClick(CellMouseEvent e) {
        String sheetName = e.getSheet().getSheetName();
        switch (sheetName) {
            case EMPLOYEE_SHEET:
                if (RangeHelper.isRangeClicked(e, generateButton))
                    fillPayrollSlips();
                break;
        }
    }
Enter fullscreen mode Exit fullscreen mode
When the button is clicked, it just starts to fill the payroll slips.
Fill payroll data into sheets
Before filling a payroll sheet, I have to read all employees’ salary data row by row from the table. The table also has a corresponding named range, PayrollTable, that I don’t need to hard code its cell address.
private void fillPayrollSlips() {
    String tableName = "PayrollTable";
    Range payrollRange = Ranges.rangeByName(sheet, tableName);
    List<Map<String, Object>> employeeSalaries = getEmployeeSalaries(payrollRange);
    generateAllPayrollSlips(employeeSalaries);
}
Enter fullscreen mode Exit fullscreen mode
To avoid filling data into a fixed cell address of the payroll sheet, I create a named range for each field that maps the corresponding column name.
Column Name <==> Named Range
Hence, I can fill data in a simple loop. Just clone (cloneSheet()) the template sheet and fill each field by the named range.
    private void generateAllPayrollSlips(List<Map<String, Object>> employeeSalaries) {
        for (Map<String, Object> employee : employeeSalaries) {
            Sheet payrollSheet = Ranges.range(spreadsheet.getBook().getSheet("Form"))
                    .cloneSheet((String) employee.get("Name"));
            for (String field : employee.keySet()) {
                Ranges.rangeByName(payrollSheet, field).setCellValue(employee.get(field));
            }
        }
    }
Enter fullscreen mode Exit fullscreen mode
With the named range, I don’t need to hard code a cell address in the code, which makes the code more robust against sheet layout change.
Source Code
I was able to turn this manual Excel copy-pasting task into an automated task in less than 100 lines. I hope you find this example interesting. You can find out the complete code at Github
keikai (5 Part Series)
1 How I Created an Online Budget Report from Excel Files
2 Enable User Input in My Spreadsheet-based App
3 Automate Excel Sheet Processing with Java
4 Protect Formulas in a Web Spreadsheet Application
5 Give your classic spreadsheet a modern touch


暂无评论内容