Hi folks, I’m back with another post.
Please check out this for previous post about Serenity.
At its core, Serenity is all about BDD.
The philosophy of Serenity is to make the test like a live documentation.
In this blog post I will share you guys how to implement UI test in Serenity with Cucumber and ScreenPlay Pattern.
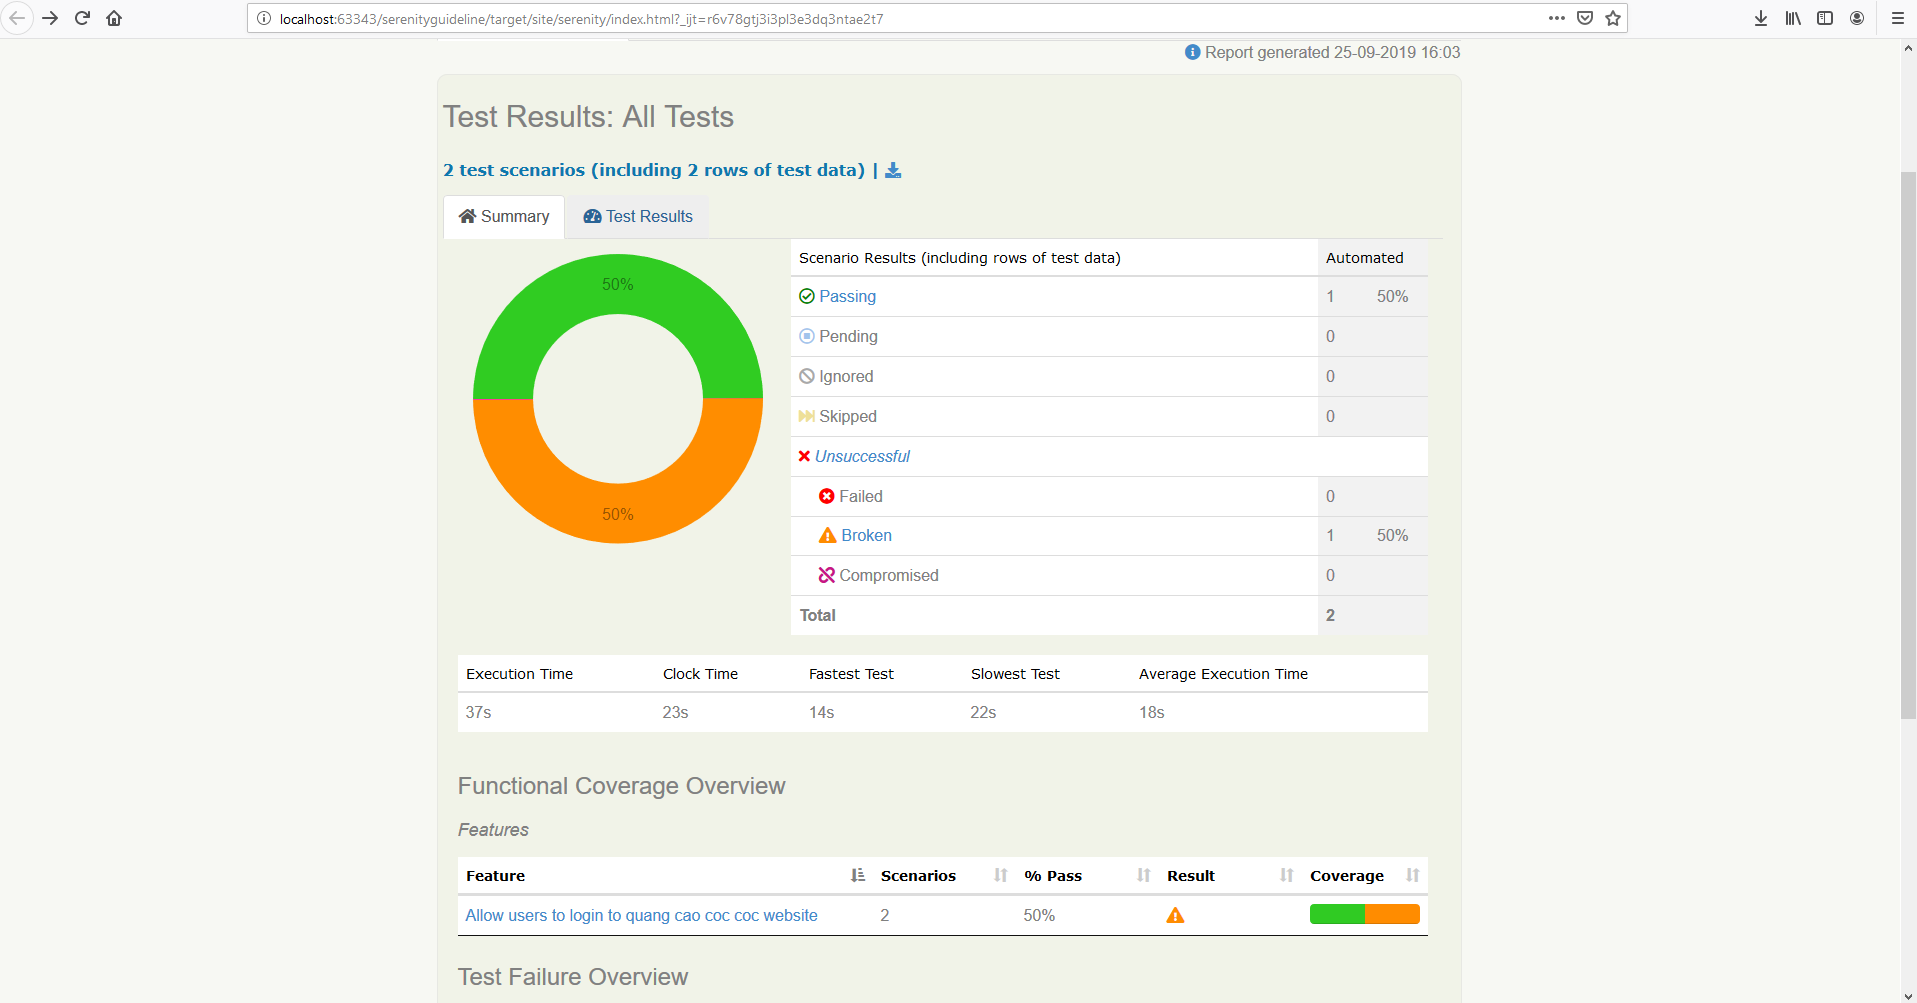
And don’t forget, how to create beautiful and detailed report like this:
I.Why Cucumber
Cucumber is a software tool used by computer programmers that supports behavior-driven development (BDD). Central to the Cucumber BDD approach is its plain language parser called Gherkin. It allows expected software behaviors to be specified in a logical language that customers can understand.
By using cucumber, we separate the intent of the tests from how it will be implemented.
Non-technical guys like BA or PO can easily understand what we are testing from feature file like
Feature: Allow users to login to quang cao coc coc website
@Login
Scenario Outline: Login successfully with email and password
Given Navigate to quang cao coc coc login site
When Login with '<email>' and '<password>'
Then Should navigate to home page site
Examples:
|email|password|
|xxxxxxxxxx|xxxxxxxxxx|
@Login
Scenario Outline: Login failed with invalid email
Given Navigate to quang cao coc coc login site
When Login with '<email>' and '<password>'
Then Should prompt with '<errormessage>'
Examples:
|email|password|errormessage|
|a|FernandoTorres12345#|abc@example.com|
``` II.Implementation We will go through the needed setup for implement test using Cucumber with Serenity. 1.POM file We would need to use serenity-cucumber for our project. So make sure to add dependency for that: ````javascript <!-- https://mvnrepository.com/artifact/net.serenity-bdd/serenity-cucumber --> <dependency> <groupId>net.serenity-bdd</groupId> <artifactId>serenity-cucumber</artifactId> <version>1.9.45</version> </dependency> ```
{% endraw %}
Also we need to add some plugins to build serenity report with maven
{% raw %}
````javascript
<plugins>
<plugin>
<groupId>org.apache.maven.plugins</groupId> <artifactId>maven-compiler-plugin</artifactId> <configuration>
<source>8</source> <target>8</target> </configuration> </plugin> <plugin>
<groupId>org.apache.maven.plugins</groupId> <artifactId>maven-compiler-plugin</artifactId> <version>3.8.0</version> </plugin> <plugin>
<groupId>org.apache.maven.plugins</groupId> <artifactId>maven-surefire-plugin</artifactId> <version>2.22.0</version> <configuration>
<testFailureIgnore>true</testFailureIgnore> </configuration> </plugin> <plugin>
<artifactId>maven-failsafe-plugin</artifactId> <version>2.18</version> <configuration>
<includes>
<include>**/features/**/When*.java</include>
</includes> <systemProperties>
<webdriver.driver>${webdriver.driver}</webdriver.driver> </systemProperties> </configuration> </plugin> <plugin>
<groupId>net.serenity-bdd.maven.plugins</groupId> <artifactId>serenity-maven-plugin</artifactId> <version>${serenity.maven.version}</version> <executions>
<execution>
<id>serenity-reports</id> <phase>post-integration-test</phase> <goals>
<goal>aggregate</goal> </goals> </execution> </executions> </plugin> </plugins>
``` 2.Serenity config file In order to set the default config for serenity, we can use serenity.conf file or serenity.properties In this example I would like to show you about serenity.conf: ````javascript webdriver { base.url = "https://cp.qc.coccoc.com/sign-in?lang=vi-VN" driver = chrome } headless.mode=false serenity { project.name = "Serenity Guidelines" tag.failures = "true" linked.tags = "issue" restart.browser.for.each = scenario take.screenshots = AFTER_EACH_STEP console.headings = minimal browser.maximized = true } jira { url = "https://jira.tcbs.com.vn" project = Auto username = username password = password } drivers { windows { webdriver.chrome.driver = src/main/resources/webdriver/windows/chromedriver.exe } mac { webdriver.chrome.driver = src/main/resources/chromedriver } linux { webdriver.chrome.driver = src/main/resources/webdriver/linux/chromedriver } } ```
{% endraw %}
We defined some common thing like where to store driver for each environment:
{% raw %}
````javascript
drivers {
windows {
webdriver.chrome.driver = src/main/resources/webdriver/windows/chromedriver.exe
}
mac {
webdriver.chrome.driver = src/main/resources/chromedriver
}
linux {
webdriver.chrome.driver = src/main/resources/webdriver/linux/chromedriver
}
}
``` or take screenshot after each step: ````javacript serenity { take.screenshots = AFTER_EACH_STEP } ```
{% endraw %}
3.Page Object
An experienced automation test is the one who can implement the tests in an abstracted ways for better understanding and maintenaince.
For best practices of implement test in UI, we should always define page object class for the web page we are interacting with.
In the case, the web page has a lot of functions and elements, we should separate the page object into multiple one according to the features it cover for better maintenaince.
For example with LoginPage of qcCocCoc site:
{% raw %}
````javascript
@DefaultUrl("https://cp.qc.coccoc.com/sign-in?lang=vi-VN")
public class LoginPage extends PageObject {
@FindBy(name = "email")
private WebElementFacade emailField;
@FindBy(name = "password")
private WebElementFacade passwordField;
@FindBy(css = "button[data-track_event-action='Login']")
private WebElementFacade btnLogin;
@FindBy(xpath = "//form[@method='post'][not(@name)]//div[@class='form-errors clearfix']")
private WebElementFacade errorMessageElement;
public void login(String email, String password) {
waitFor(emailField);
emailField.sendKeys(email);
passwordField.sendKeys(password);
btnLogin.click();
}
public String getMessageError(){
waitFor(errorMessageElement);
return errorMessageElement.getTextContent();
}
}
``` Here we define how to find the web element, and what method we would need to use in that page. Usually, we should get rid of Thread.sleep , and find more fluent wait like in the example ````javascript public void login(String email, String password) { waitFor(emailField); emailField.sendKeys(email); passwordField.sendKeys(password); btnLogin.click(); } ```
{% endraw %}
In the above, we would wait for the emailField to appear, after that, we will run the next script.
If that field does not appear, a timeout error will happen.
4.Implement the test followed Cucumber:
First you need to declare the features file.
Features file should be located in test/resources/features folder:
{% raw %}
````javascript
@Login
Scenario Outline: Login successfully with email and password
Given Navigate to quang cao coc coc login site
When Login with '<email>' and '<password>'
Then Should navigate to home page site
Examples:
|email|password|
|xxxxxxxxxx|xxxxxxxxxx|
``` IntelliJ offered us the way to automatically create the function for each step You can click on the step and press "Alt + Enter", then follow the guide I usually put the cucumber tests in test/ui/cucumber/qc_coccoc, and define the tests in the step package: ````javascript public class LoginPage extends BaseTest { @Steps private pages.qcCocCoc.LoginPage loginPage_pageobject; @cucumber.api.java.en.Given("^Navigate to quang cao coc coc login site$") public void navigateToQuangCaoCocCocLoginSite() { loginPage_pageobject.open(); } @When("^Login with '(.*)' and '(.*)'$") public void loginWithEmailAndPassword(String email, String password) { loginPage_pageobject.login(email,password); } @Then("^Should navigate to home page site$") public void shouldNavigateToHomePageSite() { WebDriverWait wait = new WebDriverWait(getDriver(),2); wait.until(ExpectedConditions.urlContains("welcome")); softAssertImpl.assertAll(); } @Then("^Should prompt with '(.*)'$") public void shouldPromptWithErrormessage(String errorMessage) { softAssertImpl.assertThat("Verify message error",loginPage_pageobject.getMessageError().contains(errorMessage),true); softAssertImpl.assertAll(); } } ```
{% endraw %}
Here we extend BaseTest for the benefit of using assertion
The value for email and password we put in the feature file can be gotten by using regex like @When("^Login with '(.*)' and '(.*)'$") and define input value for the function (String email, String password)
{% raw %}
````javascript
@RunWith(CucumberWithSerenity.class)
@CucumberOptions(features = "src/test/resources/features/qcCocCoc/", tags = { "@Login" }, glue = { "ui.cucumber.qc_coccoc.step" })
public class AcceptanceTest {
}
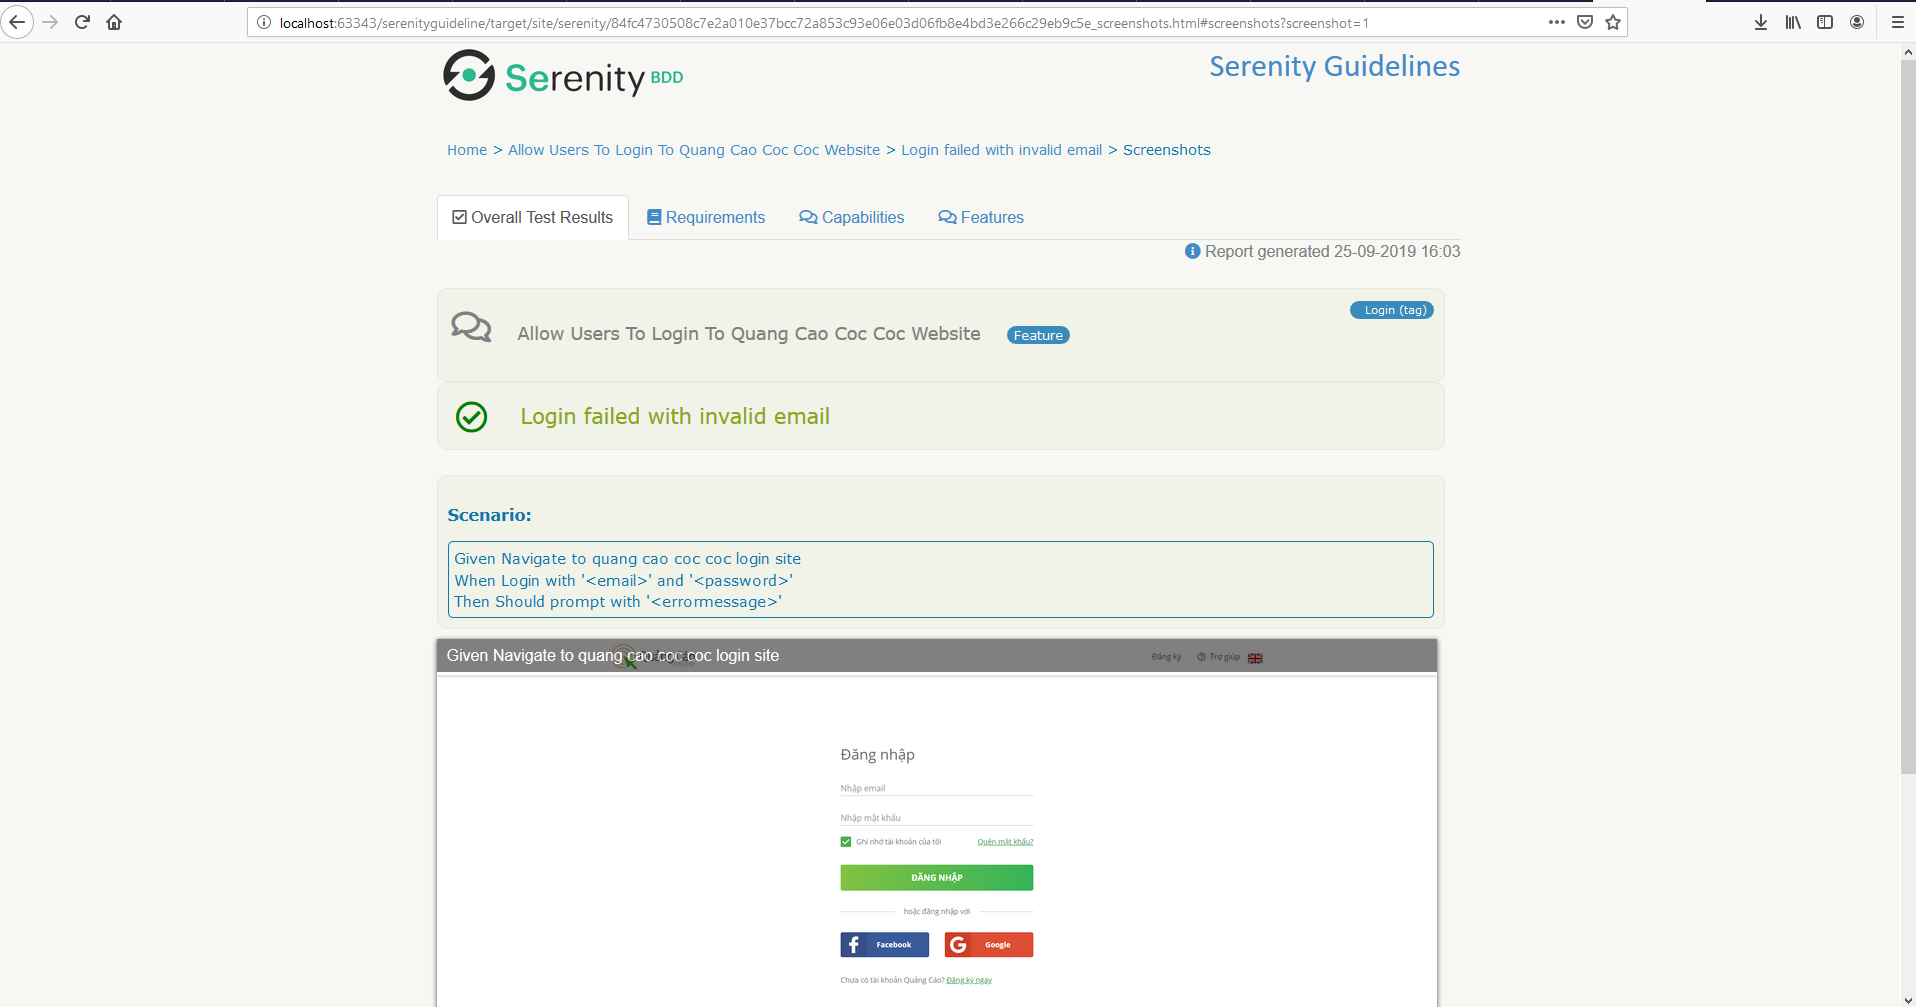
``` We should create the AcceptanceTest class for more flexible way to run tests with tags. We need to specify the path to the features file "src/test/resources/features/qcCocCoc/", and the path to the step file: "ui.cucumber.qc_coccoc.step" 5.How to run the test - You can run the test from feature file by right click on the scenario and choose run in the IDE - Or you can run from command line: mvn clean verify -Dtest=path_to_the_AcceptanceTest 6.Serenity report To create beautiful Serenity report, just run the following command line mvn clean verify -Dtest=path_to_the_AcceptanceTest serenity:aggregate The test report will be index.html and located in target/site/serenity/index.html by default The summary report will look like this:  With screenshot capture after each step in Test Results tab:  As usual, you can always checkout the sourcode from github: [serenity-guideline](https://github.com/cuongld2/serenityguideline) Yay. That's it for today. If you like the blog post, leave a heart or a comment. I will write another post for screenplay pattern with UI test in a couple of days. Take care~~ Notes: If you feel this blog help you and want to show the appreciation, feel free to drop by : [<img src="https://thepracticaldev.s3.amazonaws.com/i/cno42wb8aik6o9ek1f89.png">](https://www.buymeacoffee.com/dOaeSPv ) This will help me to contributing more valued contents. Enter fullscreen mode Exit fullscreen mode
原文链接:Serenity automation framework – Part 2/4 – Automation Test with UI using Cucumber


暂无评论内容