Introduction
In this tutorial, you will create an application that can be used as a web-based caller ID. Your application will make requests to the Nexmo Number Insight API and display the results.
Feel free to refer to the nexmo-community/java-caller-id repository as you follow along.
git clone --branch getting-started git@github.com:nexmo-community/java-caller-id.git
Enter fullscreen mode Exit fullscreen mode
Prerequisites
To work through this tutorial, you will need a Nexmo account. Sign up now if you don’t already have an account.
During the sign-up process you will be assigned an API key and secret. You will need these in a later step of the tutorial.
You will be using Gradle to manage your dependencies and run your application. Additionally, you’ll need to make sure you have a copy of the JDK installed.
Building a Caller ID with Java
This tutorial will walk you through the following steps:
- Using Gradle to setup a new Java project.
- Using the Spark framework to serve the caller ID page as well as processing number lookup requests.
- Creating a front end which can be used to collect phone numbers to look up.
Using Gradle to Setup a New Java Project
You will use Gradle to manage your dependencies and to create and run your Java application.
The gradle init --type=java-application command will create all of the folders you will need as well as a sample class where you will be writing your code.
From the command line, create a new Java project with the following commands:
mkdir java-caller-id
cd java-caller-id
gradle init --type=java-application
Enter fullscreen mode Exit fullscreen mode
Using the Spark Framework
You will use the Spark framework to both serve the caller ID page as well as process number lookup requests through an API.
Adding the Dependencies
Add the following to the dependencies block in your build.gradle file:
// Spark Framework
compile 'com.sparkjava:spark-core:2.7.2'

// Nexmo Java Client
compile 'com.nexmo:client:3.10.0'

// DotEnv
compile 'io.github.cdimascio:java-dotenv:3.1.1'
Enter fullscreen mode Exit fullscreen mode
Creating the API Route
Gradle creates an App class in src/main/java containing getGreeting and main methods. Delete the getGreeting method as we don’t need it.
Defining the Environment
Instead of hard-coding your Nexmo API key and secret, you will be storing it in an environment variable.
For the purpose of this demo you will be using the Dotenv library and a .env file.
Create a resources folder in src/main and create a file called .env with the following information:
NEXMO_API_KEY=your-api-key
NEXMO_API_SECRET=your-api-secret
Enter fullscreen mode Exit fullscreen mode
Replace your-api-key and your-api-secret with your Nexmo API key and secret respectively.
Defining the Route
It can be helpful to store things as constants. You will instantiate a new NexmoClient using your NEXMO_API_KEY and NEXMO_API_SECRET defined earlier.
Additionally, you will define some constants that will be used in your Spark routing and an ObjectWriter which will be used to build the JSON response from your API.
Define the following constants and variables in App:
// Environment
private static final String KEY = Dotenv.load().get("NEXMO_API_KEY");
private static final String SECRET = Dotenv.load().get("NEXMO_API_SECRET");

private final InsightClient insightClient = new NexmoClient(new TokenAuthMethod(KEY, SECRET)).getInsightClient();
private final ObjectWriter writer = new ObjectMapper().writer();
Enter fullscreen mode Exit fullscreen mode
Next, you will create a new method which will return a spark.Route. This route will accept a NUMBER_PARAM in the URL, perform a Nexmo Number Insight API request, and return a JSON response containing the AdvancedInsightResponse information.
Create the following method in App below the main method:
/** * @return A {@link Route} which will handle looking up the number insight information. */
private Route createRequestRoute() {
    return (request, response) -> {
        final String number = request.params(NUMBER_PARAM);
        final AdvancedInsightResponse advancedInsightResponse = insightClient.getAdvancedNumberInsight(number,
                "",
                "",
                true
        );

        response.type(ContentType.APPLICATION_JSON.getMimeType());
        return this.writer.writeValueAsString(advancedInsightResponse);
    };
}
Enter fullscreen mode Exit fullscreen mode
Register the Route
You need to configure Spark so that it knows when to use the route you just defined.
First you will configure the port that Spark runs on, and then you will configure the path that your newly-created route will answer to (/api/:number).
The path that you define will use the :number parameter which will represent a phone number inside of the route.
Add the following constant to App near all of the other constants you have created:
private static final int PORT = 3000;

private static final String NUMBER_PARAM = ":number";
private static final String REQUEST_ROUTE = "api/" + NUMBER_PARAM;
Enter fullscreen mode Exit fullscreen mode
Add the following method to App above the createRequestRoute method:
/** * Start the Sparkframework Application */
private void start() {
    Spark.port(PORT);
    Spark.get(REQUEST_ROUTE, createRequestRoute());
}
Enter fullscreen mode Exit fullscreen mode
Now, you will change the main method in App in order to start Spark when the application is run.
Change the main method in App to the following:
public static void main(String[] args) {
    new App().start();
}
Enter fullscreen mode Exit fullscreen mode
Start your application using the gradle run command.
You can now navigate to http://localhost:3000/api/13034997111 and should see a response similar to the following:
{ "status": 0, "ported": "ASSUMED_NOT_PORTED", "roaming": { "status": "NOT_ROAMING", "roaming_country_code": null, "roaming_network_code": null, "roaming_network_name": null }, "status_message": "Success", "error_text": null, "request_id": "bf845c39-d0e7-4004-bd68-b8bbadb3b5a6", "international_format_number": "13034997111", "national_format_number": "(303) 499-7111", "country_code": "US", "country_code_iso3": "USA", "country_name": "United States of America", "country_prefix": "1", "request_price": "0.04000000", "remaining_balance": "39.02969834", "original_carrier": { "name": "United States of America Landline", "country": "US", "network_code": "US-FIXED", "network_type": "LANDLINE" }, "current_carrier": { "name": "United States of America Landline", "country": "US", "network_code": "US-FIXED", "network_type": "LANDLINE" }, "caller_name": "Us Time & Frequency Division", "first_name": null, "last_name": null, "caller_type": "BUSINESS", "valid_number": "VALID", "reachable": "UNKNOWN", "lookup_outcome": 1, "lookup_outcome_message": "Partial success - some fields populated" } Enter fullscreen mode Exit fullscreen mode
Storing Static Content
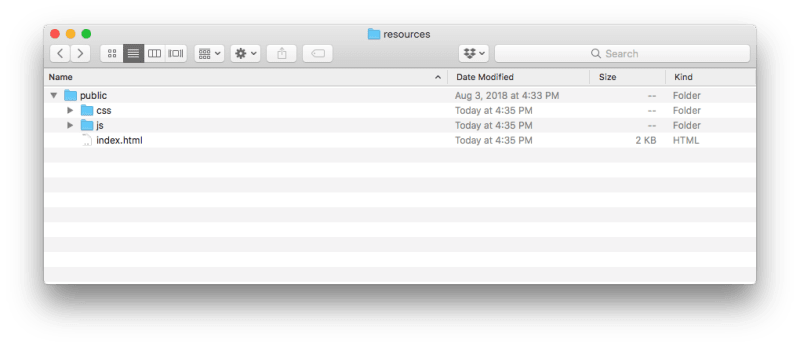
You will need a folder for holding your static content. This folder should go in the resources directory under src/main which you created earlier. A good convention is to name the folder public and to also put a css and js folder.
Add an index.html file to the public folder with the following content:
<!DOCTYPE html>
<html lang="en">
<head>
    <meta charset="UTF-8">
    <title>Caller ID</title>
</head>
<body>
<h1>Hello World!</h1>
</body>
</html>
Enter fullscreen mode Exit fullscreen mode
Serving Static Content
Static content is served out of a specific folder. You will create a constant to represent the location of this folder.
Define the following constants in App:
private static final String STATIC_FILE_LOCATION = "/public";
Enter fullscreen mode Exit fullscreen mode
Now you will need to update Spark so that it knows to serve static content from this location.
Update the start method in App to the following:
/** * Start the Spark Framework Application */
private void start() {
    Spark.staticFileLocation(STATIC_FILE_LOCATION);
    Spark.port(PORT);
    Spark.get(REQUEST_ROUTE, createRequestRoute());
}
Enter fullscreen mode Exit fullscreen mode
Run the gradle run command.
This will start your application and start serving your index.html file at http://localhost:3000. Navigating to this address in your browser will display the Hello World text in the index.html page you previously made.
Building a User Interface
Now that you have Java and Spark performing requests to Nexmo Number Insight API and serving static content, it’s time to move on to building a user interface.
Example User Interface
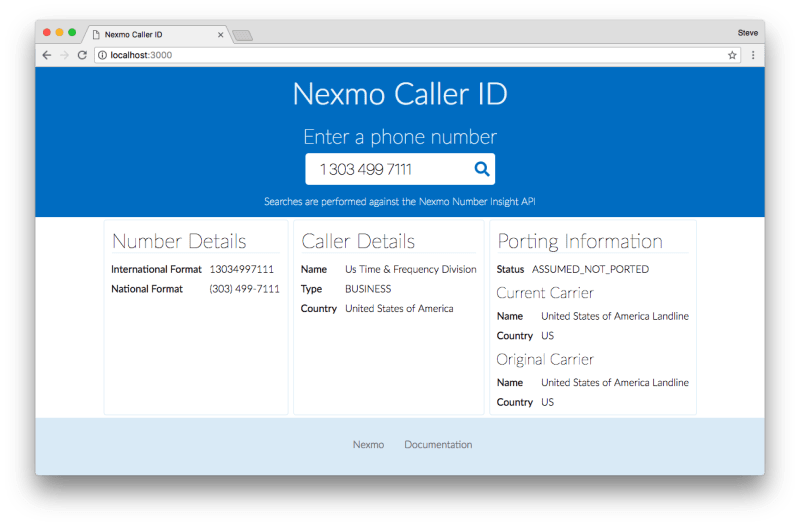
The following is one approach to a user interface. It uses JavaScript to make AJAX calls to the API you built in an earlier step. It then renders the information on the page. It also uses the cleave.js JavaScript library to format the phone number on input.
The result will produce the following page:

Create the Index Page
Replace your index.html with the following:
<!DOCTYPE html>
<html lang="en">
<head>
    <meta charset="UTF-8">
    <meta name="viewport" content="width=device-width,minimum-scale=1,initial-scale=1,user-scalable=no">
    <link rel="stylesheet" href="css/style.css">
    <link rel="stylesheet" href="https://use.fontawesome.com/releases/v5.2.0/css/all.css"
          integrity="sha384-hWVjflwFxL6sNzntih27bfxkr27PmbbK/iSvJ+a4+0owXq79v+lsFkW54bOGbiDQ" crossorigin="anonymous">
    <title>Nexmo Caller ID</title>
</head>
<body>
<div class="nav">
    <div class="inner-nav">
        <h1>Nexmo Caller ID</h1>
    </div>
</div>
<div class="page">
    <div class="search">
        <div class="inner-search">
            <h1>Enter a phone number</h1>
            <div class="search-bar">
                <div class="search-bar-input">
                    <form>
                        <input type="text" class="phone-input" id="phone-number" placeholder="+1 123 456 7890"
                               autofocus>
                        <button class="form-button" id="look-up"><i class="fas fa-search"></i></button>
                    </form>
                </div>
            </div>
            <p>Searches are performed against the Nexmo Number Insight API</p>
        </div>
    </div>
    <div class="details" hidden></div>
</div>
<div class="footer">
    <div class="inner-footer">
        <ul>
            <li><a href="https://nexmo.com">Nexmo</a></li>
            <li><a href="https://developer.nexmo.com/number-insight/overview">Documentation</a></li>
        </ul>
    </div>
</div>
</body>
<script src="https://cdnjs.cloudflare.com/ajax/libs/cleave.js/1.4.2/cleave.min.js"></script>
<script src="https://cdnjs.cloudflare.com/ajax/libs/cleave.js/1.4.2/addons/cleave-phone.i18n.js"></script>
<script src="js/app.js"></script>
</html>
Enter fullscreen mode Exit fullscreen mode
Style the Index Page
Create style.css in the src/main/resources/public/css folder with the following content:
body, html {
    height: 100%;
    margin: 0;
    padding: 0;
    font-family: Lato, sans-serif;
    background-color: #deedf7;
    font-weight: 200;
}

form {
    display: flex;
}

h1, h2, h3, h4 {
    font-weight: 100;
    margin: .25em;
}

.inner-nav h1 {
    font-weight: 300;
    font-size: 3em;
}

.nav {
    background-color: #0077c8;
    color: #eef6fb;
}

.inner-nav {
    display: flex;
    width: 100%;
    max-width: 970px;
    margin: auto;
    justify-content: center;
}

.search {
    background: #0077c8;
    display: flex;
    text-align: center;
    width: 100%;
    flex-flow: column;
}

.details {
    background: #ffffff;
    display: flex;
    text-align: center;
    width: 100%;
    flex-flow: row;
    justify-content: center;
    flex-wrap: wrap;
}

.inner-details {
    text-align: left;
    border: 1px solid #deedf7;
    border-radius: 4px;
    margin: 0.25em;
    padding: 0.25em;
}

.inner-details h1 {
    border-bottom: 1px solid #deedf7;
}

.output-table {
    text-align: left;
}

.output-table .side-heading {
    font-weight: normal;
    text-align: left;
}

.output-table td {
    padding: 5px;
}

.inner-search {
    width: 100%;
    max-width: 970px;
    margin: auto;
    padding: 0 5px;
    color: #eef6fb;
}

.inner-search h1 {
    font-weight: 100;
}

.inner-search p {
    color: #fcfcfd;
    font-weight: 100;
}

.search-bar {
    position: relative;
    width: 100%;
    margin: auto;
    z-index: 50;
    max-width: 300px;
}

.search-bar-input {
    position: relative;
    z-index: 51;
    background: #ffffff;
    display: flex;
    text-align: center;
    height: 50px;
    border-radius: 5px;
}

.search-bar-input input {
    border: 0;
    background-color: transparent;
    display: block;
    width: 100%;
    font-size: 1.5em;
    padding: .5em 1em;
    font-weight: 100;
}

.search-bar-input input:focus, .search-bar-input button:focus {
    outline: none;
}

.search-bar-input button {
    background-color: transparent;
    border: 0;
    cursor: pointer;
    font-size: 1.5em;
    color: #0077c8;
}

.inner-footer ul {
    display: flex;
    flex-wrap: wrap;
    justify-content: center;
    list-style: none;

}

.inner-footer ul a {
    padding: 1em;
    font-size: 1em;
    text-decoration: none;
    display: flex;
    color: #717171;
}
Enter fullscreen mode Exit fullscreen mode
Create the JavaScript
Create app.js in the src/main/resources/public/js folder with the following content:
let cleave = new Cleave('.phone-input', {
    phone: true,
    phoneRegionCode: 'US'
});

let lookUpButton = document.getElementById("look-up");
lookUpButton.onclick = function (event) {
    event.preventDefault();
    let phoneNumber = document.getElementById("phone-number").value.replace(/[^0-9.]/g, "");
    handlePhoneNumberLookup(phoneNumber);
};

function handlePhoneNumberLookup(phoneNumber) {
    fetch("/api/" + phoneNumber)
        .then(response => {
            if (response.ok) {
                return Promise.resolve(response);
            }

            return Promise.reject("Error Fetching Number Information");
        })
        .then(response => response.json())
        .then(data => {
            renderResponse(data);
        })
        .catch(function (error) {
            console.log("Error: " + error)
        })
}

function renderResponse(data) {
    let detailsContainer = document.getElementsByClassName("details")[0];
    detailsContainer.removeAttribute("hidden");
    detailsContainer.innerHTML = '';
    console.log(data);
    if (data.international_format_number && data.national_format_number) {
        detailsContainer.innerHTML += ` <div class="inner-details"> <h1>Number Details</h1> <table class="output-table"> <tr> <td class="side-heading">International Format</td> <td>${data.international_format_number}</td> </tr> <tr> <td class="side-heading">National Format</td> <td>${data.national_format_number}</td> </tr> </table> </div>`;
    }

    if (data.caller_type && data.country_name) {
        detailsContainer.innerHTML += ` <div class="inner-details"> <h1>Caller Details</h1> <table class="pure-table pure-table-bordered output-table"> <tr> <td class="side-heading">Name</td> <td>${data.caller_name || 'Unknown'}</td> </tr> <tr> <td class="side-heading">Type</td> <td>${data.caller_type}</td> </tr> <tr> <td class="side-heading">Country</td> <td>${data.country_name}</td> </tr> </table></div>`
    }

    if (data.roaming && data.roaming.roaming_network_name && data.roaming.roaming_country_code) {
        detailsContainer.innerHTML += ` <div class="inner-details"> <h1>Roaming Details</h1> <table class="output-table"> <tr> <td class="side-heading">Network Name</td> <td>${data.roaming.roaming_network_name}</td> </tr> <tr> <td class="side-heading">Country Code</td> <td>${data.roaming.roaming_country_code}</td> </tr> </table></div> `
    }

    if (data.ported && data.original_carrier && data.current_carrier) {
        detailsContainer.innerHTML += ` <div class="inner-details"> <h1>Porting Information</h1> <table class="output-table"> <tr> <td class="side-heading">Status </td> <td>${data.ported}</td> </tr> </table> <h2>Current Carrier</h2> <table class="output-table"> <tr> <td class="side-heading">Name</td> <td>${data.current_carrier.name}</td> </tr> <tr> <td class="side-heading">Country</td> <td>${data.current_carrier.country}</td> </tr> </table> <h2>Original Carrier</h2> <table class="output-table"> <tr> <td class="side-heading">Name</td> <td>${data.original_carrier.name}</td> </tr> <tr> <td class="side-heading">Country</td> <td>${data.original_carrier.country}</td> </tr> </table></div> `
    }
}
Enter fullscreen mode Exit fullscreen mode
Test Your Final Application
Start your application with the gradle run command inside of your java-caller-id directory. Navigate to http://localhost:3000 and you will be ready to gain insight.
Conclusion
The Nexmo Number Insight API is a powerful tool for gaining useful information on numbers. It uses a vast amount of real-time data from carrier databases and Nexmo databases to give you the most accurate set of information.
Explore other ways that you might use the Nexmo Number Insight API. Think about what other services you can integrate it with.
Check out our documentation on Nexmo Developer where you can learn more about the Nexmo Number Insight API and other Nexmo offerings. See our Nexmo Quickstart Examples for Java for full code examples on this tutorial and more.


暂无评论内容